Portable Generator Carburetor Cleaning: Step-by-Step Guide
Quick Answer
Portable generator carburetor cleaning starts with cooling the engine, shutting off the fuel, and disconnecting the spark plug wire. Drain the carburetor bowl, remove the air filter, clean light deposits through the intake, or remove the bowl and jets when varnish causes starting or surging problems. Always follow your owner's manual and compare your procedure with manufacturer carburetor cleaning guidance before taking the carburetor apart.
Quick cleaning steps
- Cool the generator: Never work around gasoline while the engine or muffler is hot.
- Stop fuel flow: Close the fuel shutoff valve and drain old fuel from the carburetor bowl.
- Disconnect ignition: Remove the spark plug wire so the engine cannot accidentally start.
- Clean deposits: Use carburetor cleaner on the intake, bowl, main jet, and accessible fuel passages.
- Protect the jets: Don’t drill or aggressively scrape the small calibrated openings.
- Test outdoors: Reassemble everything, check for fuel leaks, then start the generator outside.
A dirty carburetor is one of the first things I check when a gasoline generator starts, surges, stalls, or refuses to stay running. Old fuel can leave gum and varnish in passages that are surprisingly small.
This guide shows both the simple cleaning method and the deeper bowl-and-jet method. I’ll also explain when cleaning won’t solve the problem.
What Is a Portable Generator Carburetor?
A portable generator carburetor is the engine component that mixes gasoline with incoming air before combustion. The mixture must stay within the engine’s usable range for reliable starting and steady operation.
Inside a typical small-engine carburetor you’ll find a float bowl, float, needle valve, main jet, passages, throttle plate, and choke plate. Some designs also use removable emulsion tubes or pilot jets.
- Float bowl: Holds a small supply of gasoline.
- Float and needle: Control how much fuel enters the bowl.
- Main jet: Meters fuel during normal engine operation.
- Choke: Enriches the mixture during cold starting.
- Throttle: Controls engine airflow and power response.
Gasoline that sits for long periods can leave deposits in these passages. Briggs & Stratton notes that carburetor deposits can restrict fuel and air passages enough to reduce performance or stop an engine.
How Do I Know If My Generator Carburetor Needs Cleaning?
A dirty carburetor commonly causes hard starting, unstable running, surging, or an engine that starts with choke but dies afterward. The strongest clue is usually a problem that appeared after the generator sat with gasoline in it.
I don’t assume every starting problem is the carburetor. A closed fuel valve, dirty air filter, fouled spark plug, weak ignition system, or contaminated fuel can create similar symptoms.
- Starts only with choke: The main fuel circuit may be partially restricted.
- Engine surges: Fuel flow through a jet or passage may be inconsistent.
- Starts then stalls: The bowl may refill too slowly because of restricted fuel flow.
- Won’t start after storage: Old gasoline may have left varnish inside the carburetor.
- Fuel leaks from carburetor: The float needle may be dirty, worn, or stuck.
- Black exhaust smoke: Check the choke and air filter before blaming a clogged jet.
A quick workshop clue is the choke response. If the engine runs better with extra choke, I become more suspicious of a lean fuel condition or restricted main circuit.
What Tools Do You Need to Clean a Generator Carburetor?
You don’t need an expensive tool cabinet for most portable generator carburetor cleaning jobs. The correct socket and screwdriver sizes depend on the generator model.
- Carburetor and choke cleaner
- Socket set and combination wrenches
- Flat and Phillips screwdrivers
- Needle-nose pliers
- Small catch container approved for fuel
- Shop towels
- Safety glasses
- Chemical-resistant gloves suitable for the cleaner being used
- Compressed air, if available
- Replacement bowl gasket or carburetor gasket, if needed
Some cleaners can damage paint, plastics, rubber, or electrical components. Read the cleaner label before spraying anything beyond bare carburetor metal.
How Do You Clean a Portable Generator Carburetor Safely?
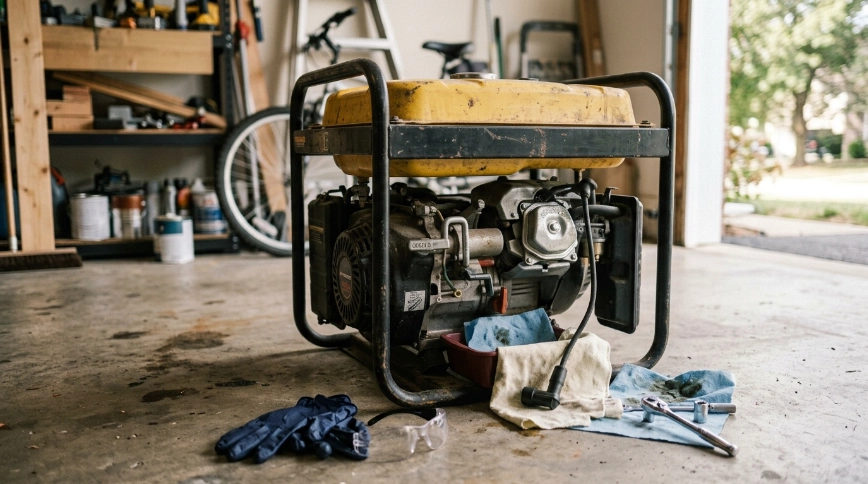
Start with a completely cool generator in a well-ventilated work area away from cigarettes, heaters, sparks, and open flames. Gasoline and many aerosol carburetor cleaners produce highly flammable vapors.
OSHA’s guidance for flammable liquids prohibits smoking and open flames around fuel-system servicing areas. I treat a generator carburetor the same way in the workshop.
- Turn the generator off.
- Allow the engine and muffler to cool completely.
- Close the fuel shutoff valve.
- Disconnect the spark plug wire.
- Keep ignition sources away from the work area.
- Have a safe container ready for drained gasoline.
For more information about handling flammable liquids, see the OSHA flammable liquids standard.
How Do You Clean a Generator Carburetor Without Removing It?
A light in-place cleaning makes sense when the engine still runs and the carburetor isn’t heavily varnished. It can clean the intake, choke plate, throttle area, and some accessible deposits.
- Close the fuel valve. Stop gasoline from flowing into the carburetor.
- Drain the bowl. Use the carburetor drain screw if your model provides one.
- Remove the air filter cover. Take out the filter and inspect it for dirt or oil saturation.
- Open the choke. This gives better access to the carburetor throat.
- Apply cleaner carefully. Follow the cleaner manufacturer’s directions and avoid electrical parts.
- Work the linkage. Move the choke and throttle mechanisms gently if they feel sticky.
- Let the solvent evaporate. Follow the product label before reassembly or starting.
Generac’s current support guidance also describes removing the air filter and applying carburetor cleaning solution into the intake on applicable non-EFI portable generators.
This method isn’t enough when the main jet is blocked. In that situation, I move to the bowl-and-jet cleaning method.
How Do You Deep-Clean a Generator Carburetor?
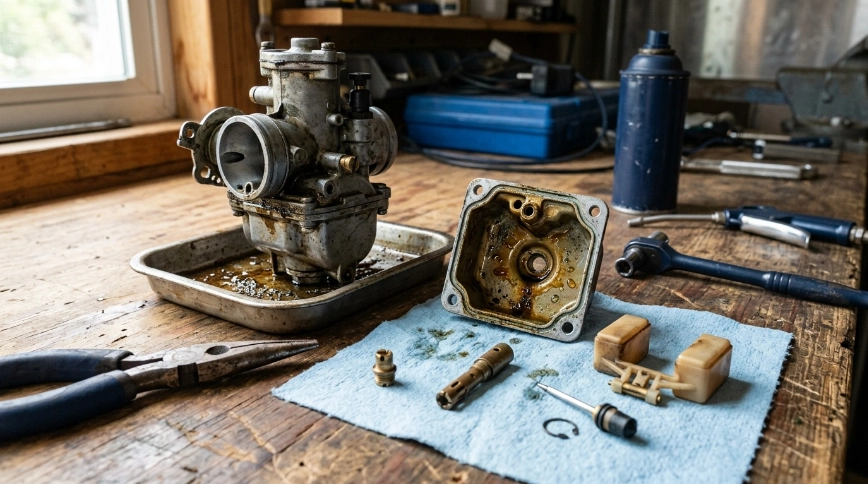
A deeper cleaning gives you direct access to the float bowl and main fuel circuit. This is the method I prefer when a generator has sat for months and now starts only with choke.
1. Drain the old gasoline
Close the fuel valve and drain the carburetor into an appropriate container. If the tank contains stale or contaminated gasoline, deal with that fuel before continuing.
2. Remove the carburetor bowl
Place a towel or catch pan beneath the carburetor. Carefully loosen the bowl fastener while supporting the bowl with your other hand.
Pay attention to the bowl’s original orientation. Some bowls aren’t perfectly symmetrical and need to return the same way.
3. Inspect the bowl
Look for sticky amber varnish, white or green corrosion, sediment, and water. Heavy corrosion can make replacement more practical than cleaning.
- Sticky varnish: Usually points to aged fuel residue.
- Loose sediment: Suggests contamination from the tank or fuel container.
- Water: May appear as separated droplets beneath the gasoline.
- Corrosion: Can permanently damage small metering surfaces.
4. Clean the main jet
Many portable-generator carburetors use the bowl bolt, a separate brass jet, or an internal jet as part of the main fuel circuit. Check your parts diagram before removing anything.
Spray carburetor cleaner through the openings and confirm that fluid passes freely. Never enlarge the calibrated holes with a drill bit.
5. Clean the emulsion tube and passages
If your carburetor has a removable emulsion tube, clean each small opening carefully. Compressed air can help clear loosened debris after solvent treatment.
A soft copper strand or manufacturer-approved jet-cleaning tool may help with stubborn debris. Don’t force a hardened wire through a precision opening.
6. Inspect the float and needle
The float should move freely without binding. The needle tip and seat should also be clean enough to stop fuel when the bowl reaches its proper level.
A leaking needle can cause fuel overflow rather than a lean condition. Cleaning may help, but worn tips or damaged seats need replacement.
7. Reassemble the carburetor
Reinstall the jet, bowl, gasket, hoses, and air-filter components exactly as they were positioned. Replace any gasket that is torn, flattened, swollen, or leaking.
Carburetor Spray Cleaning vs Jet Cleaning vs Rebuild
The best method depends on how severe the contamination is. I start with the least invasive method that matches the symptoms.
| Method | Parts Opened | Best For | When It’s Not Enough |
|---|---|---|---|
| Intake spray cleaning | Air-filter housing only | Light dirt, sticky choke or throttle | Blocked main jet or heavy varnish |
| Bowl and jet cleaning | Float bowl and accessible jets | Surging, stalling, starts only on choke | Severe internal corrosion or worn parts |
| Full removal or rebuild | Carburetor, float, needle, jets and gaskets | Heavy varnish, leaks, repeated clogging | Damaged castings, severe corrosion or unavailable parts |
What Mistakes Should You Avoid When Cleaning the Carburetor?
The most expensive carburetor-cleaning mistakes usually happen from forcing parts or ignoring gasoline safety. More solvent isn’t automatically better.
- Working on a hot engine: Heat and gasoline vapors are a dangerous combination.
- Forgetting the spark plug wire: Disconnect it before servicing the fuel system.
- Drilling a jet: Enlarging the calibrated opening can permanently change the air-fuel mixture.
- Losing linkage positions: Take a photo before removing springs or governor linkages.
- Spraying every material: Some carb cleaners aren’t safe for paint, plastic, or rubber.
- Reusing a damaged gasket: A leaking bowl gasket creates a fire hazard.
- Testing indoors: Never run a portable generator inside a garage, shed, basement, or home.
The CDC’s carbon monoxide guidance says portable generators should operate outdoors more than 20 feet from windows, doors, and vents.
What Should You Do After Cleaning the Carburetor?
Before starting the engine, inspect the carburetor and fuel hose for leaks. Wipe spilled gasoline away and allow cleaning solvents to evaporate according to their labels.
- Reinstall the air filter and cover.
- Reconnect the spark plug wire.
- Add fresh fuel if old fuel was removed.
- Open the fuel shutoff valve.
- Watch the carburetor for leaks before starting.
- Move the generator to its safe outdoor operating location.
- Start the engine and allow it to warm up without a heavy electrical load.
Listen for surging and watch whether the engine still needs partial choke. A properly cleared main circuit should normally let a warm engine operate with the choke fully open.
The U.S. Consumer Product Safety Commission generator guidance also warns against operating portable generators inside garages or other enclosed spaces.
What If the Generator Still Runs Bad After Carburetor Cleaning?
Cleaning isn’t a cure for every generator problem. If the symptoms remain unchanged, diagnose the fuel, air, ignition, and mechanical systems instead of repeatedly spraying the carburetor.
- Check fresh fuel: Contaminated gasoline can immediately refill the carburetor with debris or water.
- Inspect the fuel line: Look for pinching, deterioration, blockage, or restricted flow.
- Check the tank vent: A blocked vent can reduce fuel flow as the engine runs.
- Inspect the air filter: Excessive restriction can make the engine run rich.
- Check the spark plug: Fouling or an incorrect gap can mimic fuel problems.
- Inspect the carburetor gaskets: An intake air leak may create a lean running condition.
- Consider carburetor replacement: Severe corrosion or damaged metering parts may not respond to cleaning.
Briggs & Stratton’s small-engine carburetor guidance also points to stale fuel, air filters, spark plugs, and other maintenance issues when cleaning alone doesn’t solve poor performance.
How Can You Keep a Generator Carburetor From Clogging Again?
Prevention is easier than removing a varnished jet before the next storm. As of 2026, my basic advice remains simple: follow the fuel-storage procedure in your generator’s manual.
- Use fresh gasoline: Don’t begin storage with questionable fuel.
- Follow the manual: Manufacturers differ on draining, stabilizing, and long-term storage procedures.
- Use fuel stabilizer correctly: Measure it according to the product label when stabilization is appropriate.
- Exercise the generator: Follow the manufacturer’s recommended maintenance and test schedule.
- Keep fuel containers clean: Dirt introduced during refueling eventually reaches the carburetor.
- Inspect the air filter: Clean intake air helps the carburetor meter fuel correctly.
In the workshop, neglected storage causes more frustrating carburetor jobs than ordinary running hours. A five-minute storage routine can save a much messier cleaning job later.
Carburetor Cleaning Products I Recommend
If you’re preparing to clean a dirty generator carburetor, these are the types of products I’d keep on the bench. Always check compatibility with your generator and follow the product label.
🏆 Best Overall Cleaner
Gumout Jet Spray Carb/Choke & Parts Cleaner
★★★★★
Available in 14-ounce and 16-ounce versions, this aerosol cleaner is designed to remove gum, varnish, and dirt from carburetors and unpainted metal parts. I like an aerosol with a directional tube because it gives better control around small passages and linkage areas.
🔧 Best for Small Engines
Briggs & Stratton Carburetor/Choke Cleaner 100042
★★★★☆
Briggs & Stratton identifies its 100042 carburetor/choke cleaner for periodic small-engine carburetor cleaning. I like this option when someone wants a cleaner specifically associated with a major small-engine manufacturer.
🛡️ Best for Prevention
STA-BIL Storage Fuel Stabilizer
★★★★☆
STA-BIL markets this treatment for gasoline engines, including generators, to help prevent gum and varnish during storage. I consider stabilizer prevention rather than a substitute for physically cleaning an already blocked carburetor.
Frequently Asked Questions
Can I clean a generator carburetor without removing it?
Yes. Light deposits around the carburetor intake, choke, and throttle can often be cleaned without removing the complete carburetor. However, a clogged main jet usually requires opening the float bowl and cleaning the fuel circuit directly.
Can I spray carburetor cleaner directly into a generator carburetor?
You can use an appropriate carburetor cleaner according to both the cleaner label and your generator manufacturer’s instructions. Protect painted, plastic, rubber, and electrical components because some solvent formulas can damage materials outside the carburetor’s bare metal surfaces.
Why does my generator only run with the choke on?
A generator that runs better with the choke partly closed may have a lean fuel mixture. Common causes include a restricted main jet, low fuel flow, an intake air leak, or another fuel-system restriction, so carburetor cleaning is a logical diagnostic step.
Should I replace or clean a dirty generator carburetor?
Clean it first when deposits are the main problem and the carburetor body remains in good condition. Replacement becomes more sensible when you find severe corrosion, damaged castings, worn fuel-control parts, persistent leakage, or problems that return after careful cleaning.
How often should a portable generator carburetor be cleaned?
There isn’t one cleaning interval that fits every portable generator. Follow the maintenance schedule in the owner’s manual and clean the carburetor when symptoms or contamination justify it rather than repeatedly disassembling a carburetor that operates correctly.
Final Takeaway
Portable generator carburetor cleaning is usually manageable when you work carefully and start with the correct diagnosis. Light buildup may need only intake cleaning, while storage-related varnish often requires opening the bowl and clearing the main fuel circuit.
The bigger win is preventing the problem from returning. Use fresh fuel, follow your generator’s storage instructions, keep the air and fuel systems clean, and never operate the generator indoors after the repair.

Hi, I’m Michael Turner. I own a generator workshop in the United States and founded HomeGeneratorBlog to share practical, hands-on guidance about generator installation, maintenance, troubleshooting, safety, and backup power solutions. My goal is to help homeowners make smarter, more confident decisions through clear and reliable information